

Heavy Duty Flagpole Installation Tips for a Solid Setup
Table of Contents
- Heavy Duty Flagpole Installation Tips: Start With the Foundation
- Planning the Site and Checking Local Requirements
- Flagpole Foundation Depth: Sizing the Hole to the Pole
- Flagpole Ground Sleeve Installation: Centering and Plumbing the Sleeve
- Mixing and Pouring Concrete Around the Sleeve
- Flagpole Installation in Sandy Soil: Wider Holes and Better Drainage
- Flagpole Installation Safety: Lifting, Crew Size, and Jobsite Precautions
- Troubleshooting, Inspection, and Heavy Duty Hardware
- Frequently Asked Questions
Last Updated: October 4, 2026
Heavy Duty Flagpole Installation Tips: Start With the Foundation
Heavy duty flagpole installation tips almost always come back to one thing: the foundation. Get that wrong and the best pole on the market will lean, loosen, or fail in the first strong gust. At Armor Flagpoles, we understand that a proper foundation is crucial; a hole that is too shallow, too narrow, or never drains properly can compromise even the strongest pole.

Here's the part most guides skip. The pole is only half the system. The ground sleeve and the concrete around it carry the load, absorb the wind, and keep everything plumb for years. Our telescoping poles use 10-gauge 7000-T8 aluminum, and that strength only pays off when the base is built to match it.
Below, we'll walk through the full process step by step, from planning and permits to pouring concrete and lifting the pole. We'll also cover the mistakes that cause the most callbacks, plus how to size a foundation for coastal sand and high-wind zones.
Planning the Site and Checking Local Requirements
Start by picking a spot with clear sky above and open ground below. Before you dig, confirm what's buried and what your local code allows.
Call 811 before you dig. This free service marks underground utilities so you don't hit a gas, water, or power line. It's the single most important safety step, and it's the law in most states.
Then check with your local building department. Many areas require a permit for a pole above a certain height, and some HOAs cap height or ban certain placements. Rules vary by city and county, so confirm yours in writing before you buy or dig.
Plan for wind and soil too. A pole on an open ridge or a coastal lot faces far more load than one tucked behind a tree line. Loose or sandy soil needs a wider hole. We'll size that in the next section.
- Keep the pole clear of power lines, trees, and rooflines
- Pick a spot you can see from the street or porch
- Leave room to walk around the base for future service
- Confirm your HOA and permit rules first
Flagpole Foundation Depth: Sizing the Hole to the Pole
Flagpole foundation depth depends on pole height, wind exposure, and soil type. A deeper, wider hole gives the concrete more mass to resist the overturning force a tall pole creates in a gust. That force grows with the square of wind speed, so a 30 mph gust pushes roughly four times harder than a 15 mph breeze on the same pole and flag.
As a general rule, the hole should be at least as deep as the pole is tall in feet divided by ten, then rounded up, and widened for soft ground. Your manufacturer's instructions are the final word, so always follow those numbers first.
Why Soil Type Changes the Hole
Soil bearing capacity is the load the ground can carry per square foot before it shifts. Packed clay and undisturbed native soil hold well. Loose sand, fill dirt, and coastal sand hold far less, so the footing must spread the load over a larger area. That is why a sandy lot needs a wider hole than the same pole on firm ground.
A common pattern practitioners use is to widen the hole one size step for sandy or fill soil and two steps for loose coastal sand. Depth stays tied to pole height, but width does the work of spreading the load.
Depth and Width by Pole Height
Use this table as a starting guide, then adjust for your soil and wind zone. Coastal and sandy sites need the wider end of each range, and often one step beyond it.
Pole Height |
Hole Depth |
Hole Width (firm soil) |
Hole Width (sandy/coastal) |
Notes |
|---|---|---|---|---|
20 ft |
24-30 in |
18-24 in |
24-30 in |
Sheltered site, firm ground |
25 ft |
30-36 in |
24-30 in |
30-36 in |
Add width for sandy ground |
30 ft |
36-42 in |
30-36 in |
36-42 in |
High wind or coastal: go wider |
Wind Exposure and Frost Depth
Open sites, ridges, and shorelines see higher sustained wind and more turbulence than a lot tucked behind a tree line. If your site is exposed, size to the wider end of the range even on firm soil.
In cold regions, the footing should also reach below the local frost line so freezing and thawing soil does not lift or shift the base. Your local building department can tell you the frost depth for your area.
Flagpole Ground Sleeve Installation: Centering and Plumbing the Sleeve
Flagpole ground sleeve installation is where the whole job is won or lost. The sleeve is the tube the pole slides into, and it must sit dead center, perfectly plumb, and at the right height so the pole stands straight.
We provide a custom aluminum ground sleeve with our kits because the sleeve is part of the strength system, not an afterthought. Set it so the top sits a couple of inches above the finished grade, which keeps water and dirt out of the tube.
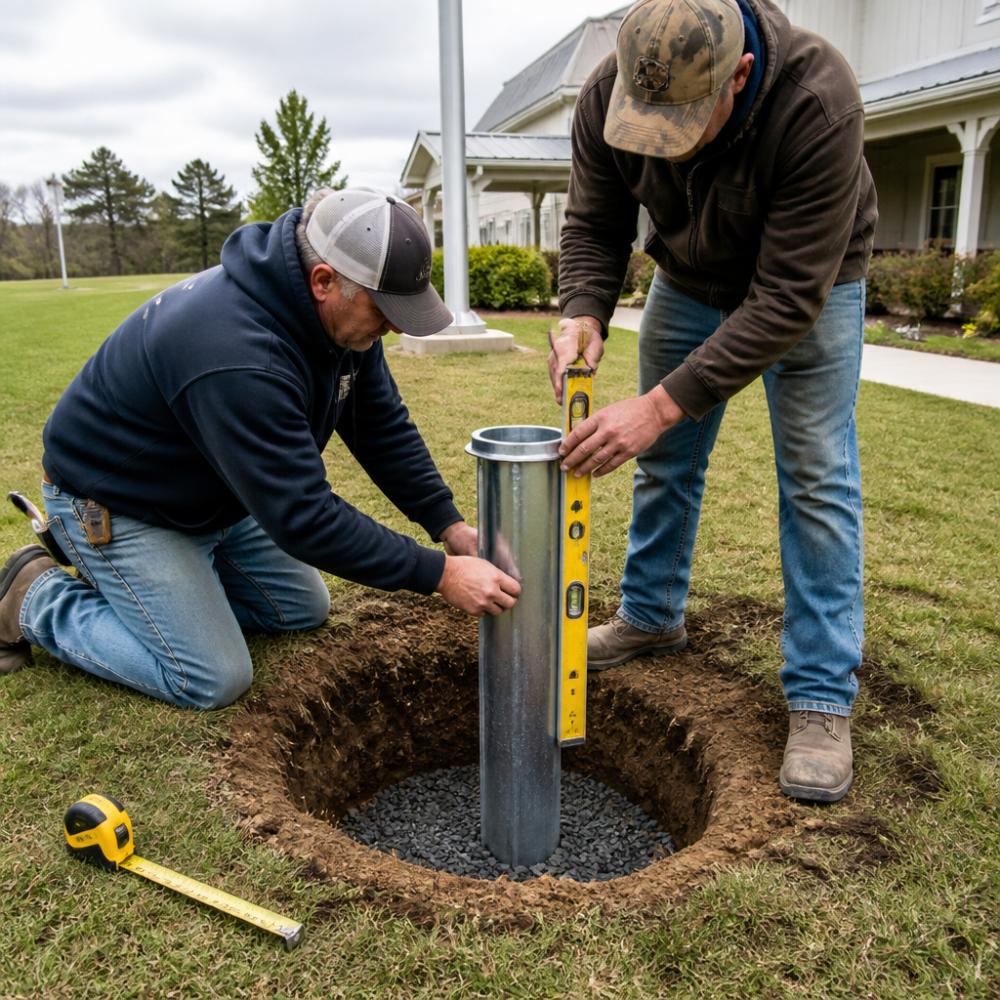
Check plumb on two sides, not one. A sleeve that looks straight from the front can lean sideways. Use wood shims to hold it in place while you check, and re-check after any bump or concrete pour.
Gravel, Drainage, and Keeping the Sleeve Plumb
Put a few inches of gravel in the bottom of the hole before the sleeve goes in. Gravel gives water a place to drain so the base doesn't sit in a puddle that freezes and shifts.
Then set the sleeve and confirm it's level and plumb again. Brace it so it can't move during the pour. A sleeve that shifts a half inch now means a pole that leans for good.
- Add 3-6 inches of gravel for drainage
- Center the sleeve in the hole
- Check plumb on two sides with a level
- Shimm and brace before pouring
Mixing and Pouring Concrete Around the Sleeve
Use a concrete mix rated for structural footings, and mix it to the strength the bag specifies. A common choice is a high-strength mix, but follow the manufacturer's instructions on the bag for water and ratios.
Pour in stages and tamp the concrete to remove air pockets. Work it around all sides of the sleeve so there are no voids. Don't dump it all on one side, which can push the sleeve out of plumb.
Once it's poured, re-check plumb one last time and adjust the braces. Then leave it alone. Concrete needs to cure before it carries a load, and rushing this step is a classic mistake. Give it the full cure time on the bag, usually several days, before you set the pole.
30 Ft Heavy Duty Superior 2 Telescoping Flagpole Kit →
Flagpole Installation in Sandy Soil: Wider Holes and Better Drainage
Flagpole installation in sandy soil needs a wider hole and extra drainage. Sand shifts and drains fast, so it offers less grip than packed clay, which means the footing must be bigger to hold the same load.
Coastal lots, especially along windy shorelines, combine loose sand with salt spray and steady gusts. That's the toughest combination for any pole. Widen the hole beyond the standard range, and consider a slightly deeper footing to add mass.
Drainage matters even more here. Sand drains well, but a hole that fills with water during storms can undermine the base. The gravel layer at the bottom helps, and so does setting the sleeve top above grade so runoff stays out.
Salt air also attacks hardware. Stainless-steel clips and a galvanized flash collar hold up far better than plain steel near the coast.
- Widen the hole well past the standard size
- Add extra gravel for drainage
- Choose stainless and galvanized hardware
- Expect more wind load on open coastal sites
Flagpole Installation Safety: Lifting, Crew Size, and Jobsite Precautions
Flagpole installation safety comes down to three things: the right equipment, enough people, and a clear plan before anyone lifts anything. A tall pole is heavy and awkward, and a fall or a dropped pole can cause serious injury.
Use at least two people for a 20 to 25 foot pole, and more for a 30 foot pole or any coastal job with wind. Never try to walk a tall pole up alone. Use a truck, a guide rope, or a second set of hands to control the lift.
Check the weather before you start. Wind makes lifting far harder and more dangerous. A calm morning beats a breezy afternoon every time.
- Wear gloves and eye protection
- Keep people clear of the lift zone
- Use a guide rope to control the pole
- Never lift in gusty wind
- Watch for overhead power lines
Troubleshooting, Inspection, and Heavy Duty Hardware
Most flagpole problems trace back to the base or the hardware, and both are easy to inspect. Check the pole and base a couple of times a year, and after any major storm.
Diagnosing Common Problems
Leaning pole. If the pole leans, the sleeve may have shifted or the footing settled. Check plumb on two sides. A small lean that appears after a storm usually means the soil around the footing moved, not that the pole bent.
Sticking or jammed sections. Grit, sand, or a bent locking mechanism is usually the cause. Rinse the sections, let them dry, and inspect the locks before forcing them.
Water in the sleeve. If water collects in the tube, the sleeve top may be sitting at or below grade. The top should sit a couple of inches above the finished grade so runoff stays out.
Flags tangle or fray fast. The swivel ring and clips are the place to look. A worn swivel or a fixed ring that does not rotate lets the flag wrap around the pole in shifting wind.
Vibration or rattle in wind. A loose halyard, a worn truck, or a flag that is too large for the pole can cause constant motion that wears hardware faster.
Matching Hardware to a Heavy Duty Pole
Heavy duty hardware makes a real difference over time. The halyard, truck, pulley, cleat, and flag size should all match the pole's capacity and your wind exposure.
- Halyard. Use a UV-resistant rope sized for the pole. A halyard that is too thin wears fast; one that is too thick can jam the truck.
- Truck and pulley. A ball-bearing truck reduces friction and halyard wear, especially on tall poles.
- Cleat. A cleat rated for the halyard size holds the flag without slipping in wind.
- Flag size. A flag that is too large for the pole adds wind load and causes vibration. Match flag size to pole height and expected wind.
- Clips and swivels. Stainless-steel clips and a ball-bearing swivel ring system help prevent flags from tangling and resist salt air near the coast.
Our kits include a ball-bearing swivel ring system to help prevent flags from tangling, stainless-steel clips, and a galvanized steel flash collar that covers the base and sheds water.
Post-Storm Inspection Checklist
- Re-check plumb and base after storms
- Clean and lube the locking mechanism
- Replace frayed halyard and worn clips
- Keep the flash collar seated over the base
- Look for cracks in the concrete or gaps where it meets the soil
For a full display, our U.S. flag code guidance on proper flag display is worth a read so you fly and retire flags correctly.
When you're ready for a pole built to match a properly sized foundation, our 30 Ft Heavy Duty Superior 2 Telescoping Flagpole Kit pairs 10-gauge 7000-T8 aluminum with a custom ground sleeve and a 15-year pole warranty.
Frequently Asked Questions
How deep should a 20 foot flagpole be in the ground?
A common rule of thumb for heavy duty flagpole installation is to bury the pole about 10 to 15 percent of its above-ground height, so a 20-foot pole usually needs a foundation hole around 2 to 3 feet deep. The exact flagpole foundation depth also depends on soil type, wind exposure, and the manufacturer's instructions. In sandy or coastal soil, go deeper and wider than the minimum, and always follow the specs that came with your pole.
How do you install a ground sleeve for a flagpole?
Dig the foundation hole to the specified depth and width, then add a few inches of gravel for drainage. Set the ground sleeve in the center of the hole and check it with a level on two sides to confirm it is plumb. Brace or shim the sleeve so it stays put, then pour concrete around it, keeping the sleeve centered and level as the concrete sets. The sleeve should sit slightly above the concrete surface so water drains away from the pole.
What should you consider when installing a flagpole in sandy soil?
Sandy soil drains fast but shifts easily, so it holds a pole less securely than packed clay or loam. Widen the foundation hole beyond the standard recommendation and add extra concrete to give the pole more bearing surface. Good drainage at the bottom of the hole matters too, since water can undercut sandy walls. Coastal areas with salt spray and gusty wind need a pole rated for that exposure, like a heavy duty telescoping model built from thick aluminum.
How do you check a flagpole installation for safety?
Once the concrete has cured and the pole is up, check that it stands plumb with a level, that the ground sleeve and flash collar sit flush and secure, and that no cracks or gaps have formed around the base. Inspect the halyard, clips, and swivel system for wear, and confirm the pole sections lock firmly in place. Recheck the base after the first strong wind and again each season, tightening or repairing anything that has loosened.
A solid flagpole setup starts underground, and that's the part most people rush. At Armor Flagpoles, we offer telescoping poles from 10-gauge 7000-T8 aluminum, made in the USA, with a custom aluminum ground sleeve, a ball-bearing swivel ring system, and a 15-year pole warranty right from the factory. Get the foundation right, and the pole will stand strong through wind, salt, and time. Get started with Armor Flagpoles and install a display built to last.