

How to Properly Ground a Residential Flagpole: 2026 Guide
Table of Contents
- Why Grounding a Residential Flagpole Matters
- Tools and Materials You Need for Flagpole Installation Tools
- Flagpole Ground Sleeve Installation: Step-by-Step for Beginners
- How to Properly Ground a Residential Flagpole: Step-by-Step
- Choosing the Best Residential Flagpoles for Wind and Grounding
- Soil Resistivity and Grounding Effectiveness
- NEC Compliance vs. DIY: What You Need to Know
- Maintenance and Inspection Schedules for Flagpole Grounding
- Conclusion
- Frequently Asked Questions
Last Updated: September 23, 2026
Why Grounding a Residential Flagpole Matters
Learning how to properly ground a residential flagpole protects your home, your family, and the pole itself. A grounded pole gives lightning a safe path to the earth instead of through your house.
Here's the core problem. A tall metal pole standing in open ground is a natural target for a lightning strike. Without a ground path, that energy travels wherever it can: into your home's wiring, your foundation, or anyone standing nearby.
Static discharge is the quieter threat. Wind blowing across a metal mast builds up electrical potential. That charge can arc to you when you touch the pole.
The National Fire Protection Association sets the standard for this work in NFPA 780, the Standard for the Installation of Lightning Protection Systems. That standard covers grounding rods, wire sizes, and bonding methods.
Below, we'll walk you through the full process, from digging the hole to bonding the mast. The steps we cover work for any telescoping flagpole, and they follow the same rules a licensed electrician would use.
Tools and Materials You Need for Flagpole Installation Tools
Gather everything before you start digging. A mid-project trip to the hardware store kills momentum, and concrete waits for no one.
Core tools:
- Post hole digger or power auger
- Tape measure and level
- Hammer and wrenches
- Shovel for backfilling
Grounding materials:
- Copper-clad grounding rod, 8 feet long
- #6 AWG bare copper wire
- Grounding clamp and pipe clamp
- Grounding block for the electrical panel
Foundation supplies:
- Bagged concrete mix
- Gravel for drainage
- PVC ground sleeve, sized to your pole's base diameter
The #6 AWG wire size isn't a suggestion. It's the minimum the code allows for a grounding electrode conductor. Go thinner and the wire can melt under a real strike.
Flagpole Ground Sleeve Installation: Step-by-Step for Beginners
A flagpole ground sleeve installation is the foundation step that decides how your pole performs for years. The sleeve is a PVC pipe set in concrete. Your flagpole slides inside it and stays put.
Digging the Hole and Setting the Sleeve
Dig a hole at least 24 inches deep for a residential pole. Wider and deeper is better in sandy or loose soil.
Line the bottom with 6 inches of gravel. This drains water away from the concrete and slows corrosion at the base.
Set the PVC sleeve in the center of the hole. Check it with a level on two sides. A sleeve that leans now means a pole that leans forever.
Pouring Concrete and Leveling the Sleeve
Mix your concrete to a thick, peanut butter consistency. Pour it around the sleeve in stages, tamping out air pockets as you go.
Recheck the level after every pour. Concrete shifts as it settles, and a small tilt gets worse as it cures.
Let the concrete cure for at least 48 hours before you set the pole. In cold weather, wait longer.
How to Properly Ground a Residential Flagpole: Step-by-Step
The grounding work itself takes about an hour once the foundation is set. Here's the full process, step by step, with the code references a licensed electrician would cite.
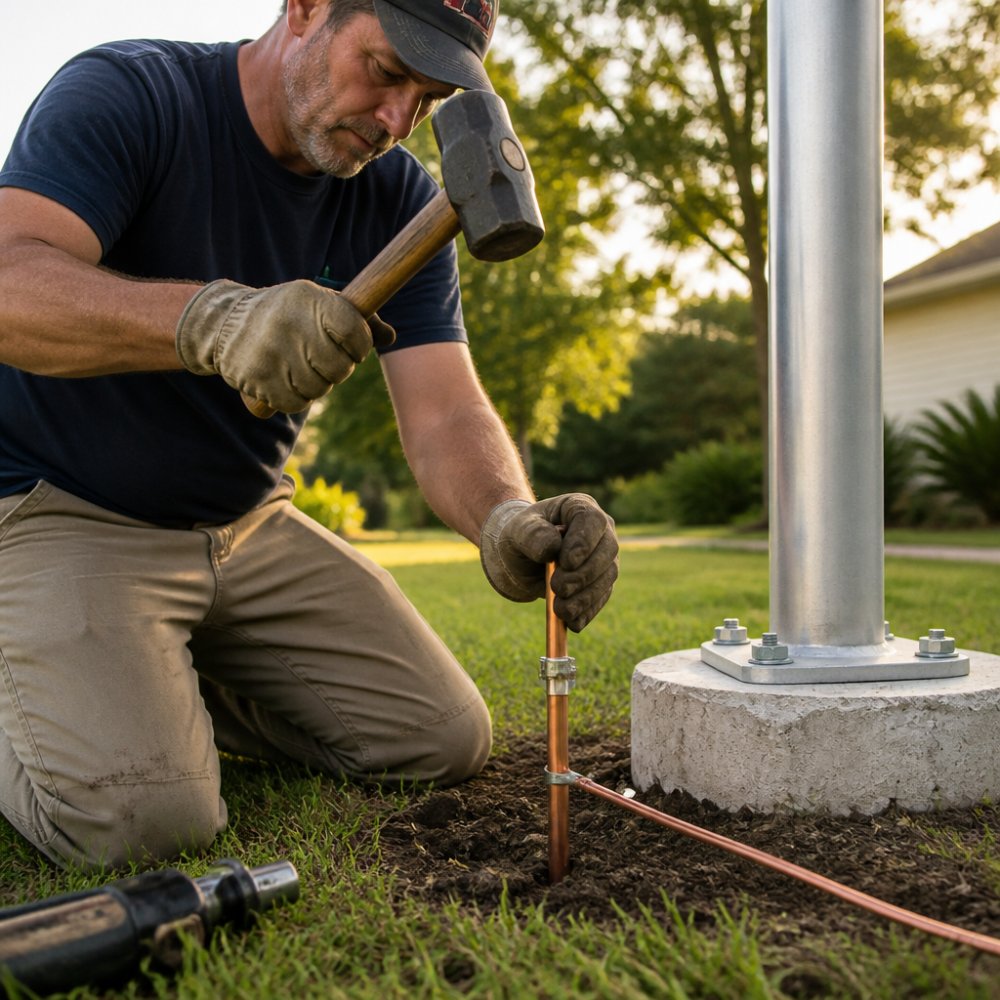
Step 1: Drive the Grounding Rod
Drive an 8-foot copper-clad rod into the soil within a few feet of the pole. Leave about 6 inches above ground so you can attach the wire.
Keep the rod at least 2 feet from the foundation. Too close, and the rod's path can damage footings or buried utilities. Call 811 before you drive anything into the ground, it's free, and it's the law in every state.
If you hit rock, move over a foot and try again. Never cut a ground rod short. A rod that doesn't reach full depth won't do its job. The National Electrical Code treats a rod as a grounding electrode under NEC 250.52(A)(5), and the code requires the rod to be driven the full 8 feet unless bedrock makes that impossible, in which case the rod must be buried horizontally in a trench at least 30 inches deep.
Step 2: Run the Ground Wire and Bond the Mast
Bonding means connecting the metal mast to the ground wire so they share one electrical path. This is the step that makes the whole system work.
Run #6 AWG bare copper wire from the grounding rod to the base of the flagpole. Keep the run as straight as you can. Sharp bends add resistance.
Attach the wire to the rod with a grounding clamp listed for direct burial. Attach the other end to the mast with a pipe clamp, tightened to bare metal. NEC 250.70 requires the clamp to be listed for the wire material and the rod material, a hardware-store hose clamp is not a legal substitute.
Secure the wire to the pole or a nearby surface every 6 feet, per NEC 250.64(B). Loose wire whips in the wind, work-hardens, and eventually breaks at the clamp.
For extra protection, bond the wire to your home's electrical panel through a grounding block. This ties the flagpole into your home's existing earth ground. The conductor that runs to the panel is sized per NEC 250.66, for #6 AWG copper, that's the minimum for most residential services.
Step 3: Verify the Connection
Before you backfill or walk away, test the system. A clamp-on ground resistance tester gives a reading in ohms without disconnecting anything. A common target for a single residential rod is 25 ohms or less, per NEC 250.53(A)(2). If you read higher, the code allows a second rod at least 6 feet away, and most practitioners find two rods in poor soil outperform one rod in good soil.
If you don't own a tester, a licensed electrician can perform a fall-of-potential test. It takes about 20 minutes and gives you a documented reading for your records.
Choosing the Best Residential Flagpoles for Wind and Grounding
The best residential flagpoles for wind are built from strong, corrosion-resistant metal with a thick wall. Grounding protects against lightning. Material strength protects against everything else.
Wind is the constant threat. A pole that flexes in a 40 mph gust will fatigue and crack within a few seasons.
This is where Armor Flagpoles takes a different approach. Our telescoping poles use 7000 T8 aluminum with a 10-gauge wall thickness. Most poles on the market use thinner, softer alloys.
What does that mean in plain terms? A thicker wall resists bending. A stronger alloy springs back instead of staying bent.
| Feature | Why It Matters | What to Look For |
|---|---|---|
| Aluminum grade | Resists bending and fatigue | 7000 T8 aluminum |
| Wall thickness | Handles wind load | 10-gauge |
| Grounding path | Carries strike current safely | #6 AWG copper wire |
| Coating | Fights salt and rust | Marine-grade finish |
| Warranty | Covers real defects | 15-year factory warranty |
If you live on the coast or in a high-wind zone, the pole's structural integrity matters as much as the grounding. Armor Flagpoles offers poles built in the USA with tanker-tough hardware and backs them with a 15-year factory warranty.
Soil Resistivity and Grounding Effectiveness
Soil type decides how well your grounding rod works. Dry sand and rocky ground resist current. Damp clay carries it away fast.
This is the part most guides skip. A perfect installation in poor soil still underperforms.
Soil conductivity varies by:
- Moisture content
- Mineral and salt levels
- Temperature
- Depth to the water table
If your soil is dry or sandy, drive a second rod at least 6 feet from the first. Two rods in poor soil beat one rod every time.
Water the area around the rod during dry spells. A little moisture drops resistance more than you'd expect.
The Occupational Safety and Health Administration guidance on grounding explains how resistance affects electrical safety. The same principles apply at home.
NEC Compliance vs. DIY: What You Need to Know
NEC compliance means following the National Electrical Code for grounding and bonding work. The code exists to prevent fires and shocks, and it applies to flagpole grounding just like any other electrical work.
Here's the part most guides get wrong. The NEC does not have a dedicated article for flagpoles. A flagpole is treated as a grounded metal structure under Article 250, and the requirements that apply depend on how the pole is wired and whether it's bonded to the home's electrical system.
What the NEC actually requires:
- A grounding electrode (rod, plate, or concrete-encased electrode) per NEC 250.52
- A grounding electrode conductor sized per NEC 250.66
- Listed clamps and connectors per NEC 250.70
- Securing and protection of the conductor per NEC 250.64
What the NEC does not require:
- A permit for a standalone flagpole that is not electrically connected to anything
- A licensed electrician for a purely mechanical ground rod installation in most jurisdictions
- Lightning protection, that's NFPA 780, a separate standard, and it's voluntary for residential flagpoles
Where local rules take over. Building departments in high-lightning regions, parts of Florida, the Gulf Coast, and the Midwest, often adopt amendments that go beyond the NEC. Some require a permit for any grounding electrode. Others require a licensed electrician to sign off on the bond to the panel. A few require a lightning protection system on any structure over a certain height.
The DIY decision framework:
| Task | DIY-friendly? | Why |
|---|---|---|
| Driving a standalone ground rod | Yes | Mechanical work, no live circuits |
| Bonding the mast to the rod | Yes | Low-voltage path, no panel work |
| Bonding to the home's electrical panel | Usually no | Live service conductors, permit likely |
| Tying in surge protection | No | Requires panel access and code knowledge |
Check with your local building department before you dig. The call is free, and it tells you whether you need a permit, an inspection, or a licensed electrician.
The National Electrical Code from the National Fire Protection Association spells out wire sizes, rod depth, and connection methods. Follow it and your work will pass inspection.
Where DIY gets risky:
- Bonding to the main electrical panel without shutting off power
- Running wire through areas with buried utilities
- Skipping the surge protection tie-in
- Assuming your soil is conductive enough without testing
If any of those steps make you nervous, hire a licensed electrician. The cost is small next to the risk.
Maintenance and Inspection Schedules for Flagpole Grounding
A grounding system needs a yearly check. Corrosion and loose clamps quietly undo good work.
Every spring:
- Inspect the grounding clamp for rust or looseness
- Check the pipe clamp at the mast
- Look for nicks or kinks in the wire
Every fall:
- Re-tighten all connections
- Clear debris from the base
- Test the rod's connection with a multimeter
After any major storm:
- Look for bent or shifted rods
- Check for scorch marks near connections
- Replace any damaged wire
A grounding rod buried in wet soil can last 30 years or more. The connections above ground fail first. That's where your attention belongs.
Snap a photo of your completed grounding setup and keep it with your home records. If you ever sell, the next owner has proof the work was done right.
Conclusion
Grounding a flagpole isn't glamorous work, but it's the difference between a safe installation and a liability. The steps are simple: dig deep, set the sleeve level, drive the rod, and bond every connection tight.
Frequently Asked Questions
Do I need to pour concrete to ground a residential flagpole?
Concrete is not required for grounding itself, but it is needed for the foundation. The grounding rod must be driven into undisturbed soil at least 8 feet deep, separate from the concrete footing. If your area has shallow bedrock or high soil resistivity, you may need multiple rods or a chemical ground enhancement material. Always check local building codes before digging.
How deep should a flagpole foundation be?
The foundation depth depends on pole height and your area's frost line. A common rule is to bury the ground sleeve so that one-sixth of the pole's above-ground height is below grade, but never less than 24 inches. In cold climates, the footing must extend below the frost line to prevent frost heave from shifting the pole. Check your local building department for the exact requirement.
Can a telescoping flagpole be installed without a permanent foundation?
Yes, many telescoping flagpoles can be mounted in a portable ground sleeve or a vehicle-mounted holder, which is useful for RVs and temporary setups. For a permanent residential installation, a concrete footing is recommended for stability in high winds. If you skip concrete, use a heavy-duty ground spike or portable base rated for your expected wind loads.
What is the best type of flagpole for residential use?
Telescoping aluminum flagpoles are popular for residential use because they are easy to raise and lower, resist rust, and can be installed with a ground sleeve. Look for models made from 7000-series aluminum with a thick wall (such as 10-gauge) for strength in high-wind or coastal areas. A 15-year warranty and replaceable parts are good indicators of long-term value.
Most homeowners get the foundation right and rush the grounding. That's the mistake that costs you later. Armor Flagpoles builds telescoping poles with 7000 T8 aluminum, 10-gauge walls, and tanker-tough hardware, made in the USA and covered by a 15-year factory warranty. When you're ready to pair a pole that survives the wind with a ground path that handles the strike, get started with Armor Flagpoles and build an installation that lasts.