

How to Secure Flagpole Base: Step-by-Step Guide
Table of Contents
- Why Securing Your Flagpole Base Matters
- What You'll Need Before You Start
- Step 1: Choose Your Installation Location and Check for Utilities
- Step 2: Flagpole Installation in Sandy Soil and Other Ground Types
- Step 3: Dig and Prepare the Foundation Hole
- Step 4: Install and Align the Ground Sleeve
- Step 5: Pour and Cure Concrete for a Stable Base
- Flagpole Base for High Winds and Coastal Weather
- Flagpole Maintenance and Inspection
- Common Installation Mistakes to Avoid
- Frequently Asked Questions
Last Updated: October 11, 2026
Why Securing Your Flagpole Base Matters
A strong, stable flagpole base is the foundation of any flag display that lasts. Without proper installation, even the highest-quality pole will lean, wobble, or fail under wind pressure. The base determines whether your flagpole stands proud through storms or topples in the first strong gust.
Securing your flagpole base is especially critical if you live in coastal areas with sandy soil, high winds, or salt spray. Florida's sandy terrain, combined with frequent hurricanes and tropical storms, puts extra stress on any in-ground installation. A poorly secured base in sandy soil can shift, settle unevenly, or wash away during heavy rain. The concrete footing must be deep enough, wide enough, and properly cured to resist both downward pressure from the pole's weight and lateral forces from wind.
What You'll Need Before You Start
Before you dig, gather the right tools and materials. Having everything ready prevents delays and ensures a professional result.
Tools Required:
- Post-hole digger or auger
- Shovel
- Level
- Measuring tape
- Concrete mixing container or wheelbarrow
- Work gloves and safety glasses
Materials Needed:
- Ready-mix concrete
- Ground sleeve (typically 24 inches for residential poles)
- Anchor bolts or mounting hardware
- Gravel or crushed stone for drainage
- Water for mixing concrete
Armor Flagpoles kits include the ground sleeve and most mounting hardware. Check your kit contents before starting.

Step 1: Choose Your Installation Location and Check for Utilities
Location matters more than most people realize. The wrong spot leads to leaning poles, damaged underground lines, or property disputes. Start by selecting a spot where your flag will be visible and won't interfere with power lines, trees, or structures.
Call your local utility locating service before digging. This free service marks underground gas, electric, water, and sewer lines. It takes a few days, so plan ahead. Hitting a utility line is dangerous, expensive, and illegal in most areas. Once utilities are marked, choose a location at least 10 feet away from any marked lines.
Confirm that your flagpole location is on your property, not your neighbor's. If you're unsure, hire a surveyor, it's cheap insurance against legal problems.
Step 2: Flagpole Installation in Sandy Soil and Other Ground Types
Soil type determines foundation design. Different soils have different load-bearing capacities, drainage properties, and frost behavior. Choosing the wrong hole depth or width for your soil type is one of the fastest ways to end up with a leaning or unstable pole.
Understanding Soil Bearing Capacity
Soil bearing capacity is the maximum weight per square foot that soil can support without settling. Sandy soil has 1,500-2,000 PSF; clay has 1,000-1,500 PSF; loam has 2,000-3,000 PSF; rock has 4,000+ PSF. A concrete footing spreads the pole's weight and wind load over a larger soil area. Sandy soil, common in coastal areas and Florida, has the lowest bearing capacity, which is why sandy installations require deeper holes and wider footings.
Sandy Soil: The Coastal Challenge
Sandy soil drains water quickly, doesn't compact well, and provides minimal lateral support. A pole installed in pure sand can shift sideways under wind load. Water moving through sandy soil can wash away fine particles around the concrete footing, creating voids that allow settlement.
For sandy soil installations:
- Hole depth: Dig 3.5 to 4.5 feet deep for residential poles (15-25 feet tall). For commercial poles (30+ feet), dig 5 to 6 feet.
- Hole diameter: Dig 6 to 8 inches wider than the ground sleeve diameter (typically 2.4 to 3.5 inches). This creates a footing that's 8 to 11 inches in diameter.
- Gravel base: Add 4 to 6 inches of coarse gravel (3/4 inch or larger) at the bottom. This improves drainage and prevents the concrete from settling into soft sand.
- Concrete volume: Use 50-80 pounds of ready-mix concrete (roughly 0.5 to 0.8 cubic feet) for sandy soil, compared to 40-60 pounds for clay or loam.
- Drainage: After concrete cures, slope the ground away from the pole to shed water. In sandy areas, water pooling around the base accelerates erosion.
Clay and Loam Soil: Standard Installation
Clay and loam compact well and provide good lateral support. For clay or loam soil: dig 2.5 to 3.5 feet deep, 4 to 6 inches wider than the ground sleeve, add 2 to 3 inches of gravel, and use 40-60 pounds of ready-mix concrete. In freeze-thaw zones, ensure the footing extends below the frost line (typically 3-4 feet in the northern U.S.). In Florida, water retention around the base can promote corrosion and algae growth.
Rocky or Hard-Packed Soil: Digging Challenges, Excellent Support
Rock and hard-packed soil provide excellent bearing capacity and lateral support. For rocky soil: dig 2.5 to 3.5 feet deep, 4 to 6 inches wider than the sleeve, add 1 to 2 inches of gravel, and use 40-60 pounds of concrete. Watch for large rocks that prevent the ground sleeve from sitting vertically; dig around them or move the installation location slightly.
Frost Lines and Winter Conditions
In northern climates, water in soil expands when it freezes, pushing up on anything above it, a process called frost heave. If your concrete footing is above the frost line, it can be pushed up by 1-2 inches each winter, causing the pole to tilt. In coastal southern areas, frost is not a concern, but sandy soil saturated with saltwater accelerates concrete deterioration.
Coastal Sandy Soil: The Worst-Case Scenario
Coastal areas combine the worst conditions: sandy soil, saltwater saturation, high winds, and frequent storms. For coastal sandy soil: dig 4.5 to 5.5 feet deep, 8 to 10 inches wider than the sleeve, use 6 inches of coarse gravel, use 5,000 PSI concrete instead of standard 4,000 PSI, and allow 28 days of curing before installing the pole. Salt-laden air slows curing and weakens concrete loaded too early. After installation, maintain a slope away from the base and rinse the concrete with fresh water periodically to remove salt deposits.
Learn more about how a secure base works with high-wind pole design on our high wind flagpole page to understand the complete system needed for coastal weather resilience.
Quick Reference: Hole Depth by Soil Type and Pole Height
| Pole Height | Sandy Soil | Clay/Loam | Rock |
|---|---|---|---|
| 15-20 feet | 3.5-4.5 feet | 2.5-3.5 feet | 2.5-3 feet |
| 20-30 feet | 4.5-5.5 feet | 3-4 feet | 3-3.5 feet |
| 30+ feet | 5.5-6.5 feet | 4-5 feet | 3.5-4 feet |
| Coastal sandy soil | Add 1 foot to sandy depth | , | , |
Step 3: Dig and Prepare the Foundation Hole
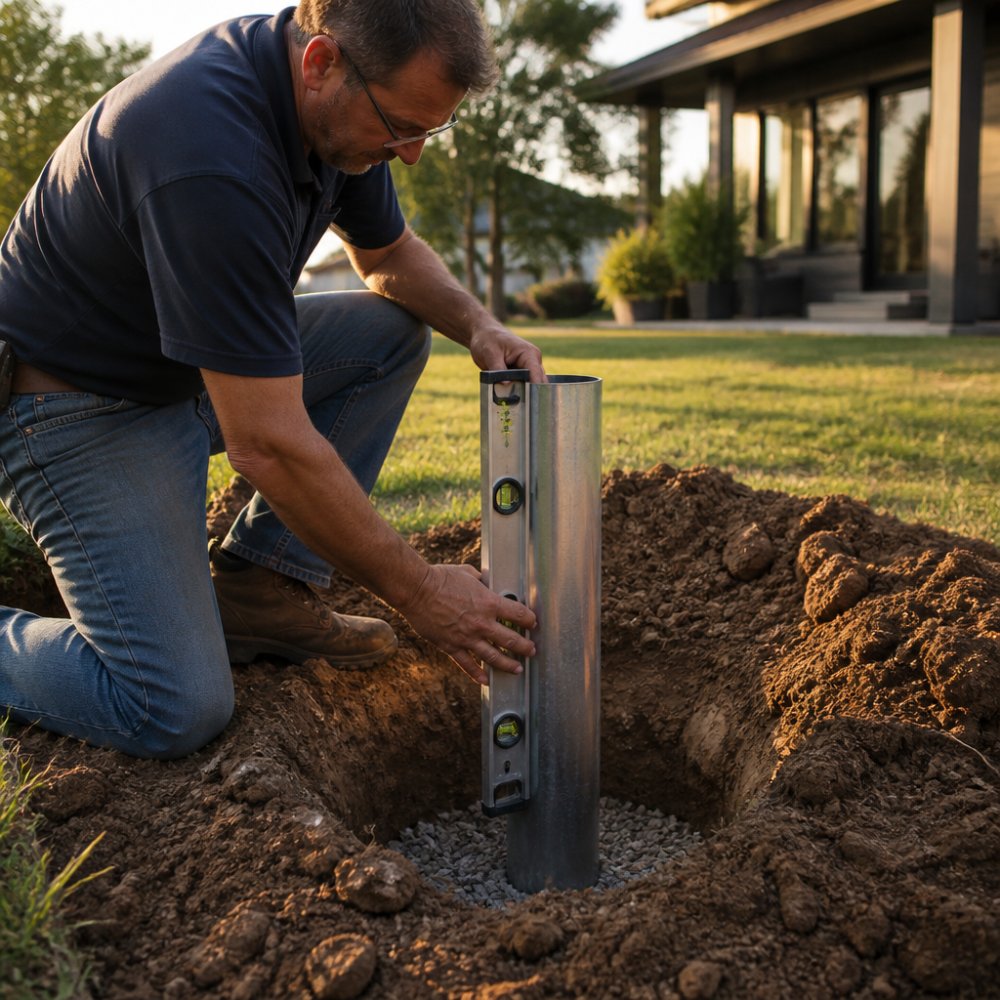
Digging the right hole is half the battle. Too shallow and the pole shifts. Too narrow and concrete doesn't grip the ground sleeve. Aim for a hole that matches your ground sleeve diameter (usually 2.4 to 3.5 inches) plus 2 to 3 inches of clearance on all sides. Dig 3 to 4 feet deep in sandy soil, 2.5 to 3 feet in other soils, keeping the hole vertical. After digging, add 2 to 4 inches of gravel or crushed stone to the bottom to improve drainage and provide a stable base for the ground sleeve.
Step 4: Install and Align the Ground Sleeve
The ground sleeve is the anchor point where your flagpole connects to the concrete footing. It must be perfectly vertical. Lower the ground sleeve into the hole and use a level on at least two sides to check vertical alignment. Adjust the sleeve position until it reads perfectly plumb, verify the top is at or slightly above ground level, and double-check alignment before pouring concrete. The ground sleeve should sit on the gravel base, not directly on soil, to prevent settling and allow drainage.
20 Ft Superior 1 Telescoping Flagpole Kit →
Step 5: Pour and Cure Concrete for a Stable Base
Concrete is what holds everything together, but not all concrete is equal. The mix you choose, how you prepare it, and how long you allow it to cure directly determine whether your base lasts decades or fails in a few years. This is especially true in coastal areas, where salt spray, moisture, and sandy soil attack weak concrete.
Selecting the Right Concrete Mix
Use ready-mix concrete for simplicity and consistency. Most ready-mix products are formulated to 4,000 PSI strength, which is standard for residential installations. For coastal areas or high-wind zones, consider a 5,000 PSI mix, it resists salt spray and moisture penetration better. If mixing on-site, follow a standard ratio: one part Portland cement, two parts sand, three parts gravel, and enough water to reach a thick, workable consistency. The water-to-cement ratio is critical; aim for 0.5 to 0.6 parts water per part cement by weight.
Mixing and Pouring Steps
- Mix concrete until the color is uniform and no dry pockets remain
- Pour concrete slowly around the ground sleeve, working from one side to avoid displacing it
- Use a shovel or stick to work the concrete down and around the sleeve, removing air pockets
- Keep checking that the sleeve stays vertical as you pour
- Fill the hole until concrete is level with the ground or slightly above (a dome shape sheds water)
- Smooth the top to create a slight slope away from the sleeve for drainage
Curing: The Step Most People Rush
Curing time is where most base failures begin. Concrete reaches 50% strength in 7 days, 75% strength in 14 days, and full strength in 28 days. Do not install the pole before concrete reaches at least 50% strength. In warm weather (70°F+), wait a minimum of 48 hours; ideally 7 days. In cool weather (50-70°F), wait 72 hours minimum; 14 days is safer. In cold weather (below 50°F), wait at least one week. In coastal/high-humidity areas, add 3-5 days to these timelines; salt-laden air and high humidity slow curing and cause micro-cracking if the pole is loaded too early.
| Curing Condition | Minimum Wait Before Pole Installation | Recommended Wait for 50% Strength | Full Strength (28 days) |
|---|---|---|---|
| Warm weather (70°F+) | 48 hours | 7 days | 28 days |
| Moderate weather (50-70°F) | 72 hours | 14 days | 28 days |
| Cold weather (below 50°F) | 1 week | 21 days | 28 days |
| Coastal/high-humidity areas | Add 3-5 days to above | Add 3-5 days to above | 28 days |
Protecting Concrete During Curing
In hot, dry weather, cover the concrete with plastic sheeting and mist it lightly with water once or twice daily for the first week to prevent cracking. In rainy conditions, cover the concrete to prevent water from washing away cement. In coastal areas, rinse the concrete surface with fresh water after 7 days to remove salt deposits that weaken the surface and accelerate corrosion.
Why This Matters in Sandy Soil and Coastal Areas
Sandy soil drains water quickly, allowing water to move through the concrete footing faster, carrying salt and minerals that degrade the concrete from inside. A weak concrete mix or rushed cure in sandy coastal soil can fail in 5-10 years instead of 30+. Using a higher-strength mix (5,000 PSI) and allowing full 28-day curing in coastal installations is the difference between a base that lasts and one that requires replacement.
Flagpole Base for High Winds and Coastal Weather
Coastal areas and high-wind regions demand extra attention to base security. Wind creates lateral forces that push the pole sideways. In coastal areas, wind speeds during hurricanes can exceed 100 mph. The base must be engineered to handle these forces with deeper holes, wider footings, and properly cured concrete. Sandy soil in coastal areas compounds the problem: salt spray corrodes metal fasteners, and moisture destabilizes sandy soil. Your base must be deeper and stronger than in inland areas. Learn more about high-wind performance on our high wind flagpole page to understand how base security and pole design work together in coastal weather.
Flagpole Maintenance and Inspection
A secure base isn't a one-time job. Regular inspection catches problems before they become failures. Check your base twice a year, and after any major storm.
What to inspect:
- Walk around the pole and look for any lean or tilt
- Check that the ground around the base is level and hasn't settled
- Look for cracks in the concrete
- Verify that the pole doesn't wobble when you push on it gently
- Check mounting hardware for corrosion or looseness
- After storms, inspect immediately for damage
If you notice settling, cracks, or lean, address it quickly. A small problem grows into a big one if ignored. Concrete cracks allow water inside, which causes corrosion and weakening. A slight lean gets worse as wind and weather stress the weak point.
Common Installation Mistakes to Avoid
Most base failures trace back to a few repeated mistakes. Learning what not to do saves time, money, and frustration.
Mistake 1: Digging too shallow. The most common error. A 2-foot hole in sandy soil won't hold. Dig at least 3 feet in sandy areas. If you're unsure, go deeper.
Mistake 2: Not checking vertical alignment. A ground sleeve that's 1 or 2 degrees off vertical looks fine at first. Over months, the lean becomes obvious. Check alignment from multiple angles before pouring concrete.
Mistake 3: Pouring concrete before utilities are marked. This is dangerous and expensive. Call your utility locating service. Wait for them to mark lines. Never guess.
Mistake 4: Installing the pole before concrete cures. Uncured concrete is soft and shifts under the pole's weight. Wait at least 48 hours, preferably a week.
Mistake 5: Using the wrong concrete mix. Ready-mix concrete works fine. Don't skimp on concrete quality to save money. Poor concrete fails faster than poor installation.
Mistake 6: Ignoring sandy soil conditions. If you're in a coastal or another sandy area, treat it as high-risk. Dig deeper and use more concrete than you think you need.
A properly secured flagpole base holds firm through decades of weather. Take the time to do it right the first time.
A secure flagpole base is the difference between a proud display that lasts for years and a costly failure. Whether you're installing a residential flagpole or a commercial display, the foundation determines success. Armor Flagpoles provides the ground sleeves, hardware, and kits you need. Our 20 Ft Superior 1 Telescoping Flagpole Kit includes everything for a complete installation, built from 10-gauge 7000 T8 aluminum engineered for durability in all weather. Get started with Armor Flagpoles and install a base that stands strong.
Frequently Asked Questions
How deep should a flagpole base be?
Hole depth depends on pole height and soil type. For residential flagpoles, the general rule is one foot of depth for every three feet of pole height. Sandy soil typically requires deeper installation, often 3-4 feet, because sand shifts and compacts differently than clay or loam. Always follow the installation instructions included with your specific flagpole kit, as base diameter and depth work together to ensure stability.
What is the best way to secure a flagpole base in sandy soil?
Sandy soil drains quickly but provides less friction than clay, so a secure flagpole base requires a larger diameter hole and proper concrete mix. Dig deeper than you would in other soil types, use a ground sleeve to contain the concrete, and pour a concrete footing that extends well below the frost line. Use a ready-mix concrete blend rated for outdoor exposure.
How can a secure flagpole base help during high winds?
A properly secured flagpole base distributes wind loads into the ground rather than allowing the pole to rock or lean. High winds create lateral forces on the pole; a stable foundation with adequate concrete depth, correct hole diameter, and vertical alignment absorbs and transfers that energy safely. Coastal and high-wind areas benefit from bases engineered for larger wind loads. Visit our high-wind flagpole page to learn how base specifications change for extreme weather conditions.
How often should you inspect a flagpole base?
Inspect your flagpole base twice yearly, spring and fall, and after severe weather events. Check for concrete cracks, water pooling around the base, rust on any exposed hardware, and signs of the pole leaning or shifting. In coastal areas with salt spray, inspect quarterly because saltwater accelerates corrosion. Test the pole for movement by gently pushing it; it should not flex or rock. Early detection of issues prevents costly repairs and keeps your flag display safe and stable.